Wednesday, 9 July 2014

My Updated Everyday Make up Routine, Plus Hair tutorial.

This week I have picked up a few new bits but I also wanted to try out some of the wet n wild make up I talked about in last weeks haul. This look is a very natural look with a pop of pink in the eyes and the lips. This has become my everyday make up routine.

1.First I start off with my base, I like to use a moisturiser before I apply foundation just to hydrate my skin as it has been dry lately. I am using the Clean and Clear Morning energy moisturiser , I love this product it gives a natural glow to the skin before foundation. For my foundation I am using the L'Oreal Paris Nude Magique Eau De Teint in 110 Warm Ivory, I picked up this foundation last Thursday and I absolutely love it, It is extremely thin but not runny, It blends into the skin so easily and it dries to a semi-matte finish without even applying powder (although I still use it). I apply this foundation with the Real Techniques Buffing Brush. I added the picture because I wanted you all to see how natural it looks once applied.

10533535_10202394293724884_1701367387_n

IMG_1003

2. I like to let the foundation sit for a few mins so while that is sitting I fill in my eyebrows, I am using the Smashbox Brow Tech in Smashing Auburn , I comb them out first then fill them in using an angled brow brush. I then set them in my place with the Wet n Wild Mega Clear Brow and Lash Mascara (which is not so clear any more).

IMG_1142

3. Now onto Contour and highlighting , I love to cream contour I think it is so easy and very natural looking compared to powder contour. I am using the w7 Face Shaper Kit to contour and I am highlighting and concealing with the Wet n Wild Cover All Concealer in Light. To contour I Like to apply a stroke of the cream bronzer using the brush which came with the w7 kit underneath my cheekbones and along my hairline and also down the sides of my nose, and to highlight I apply the concealer in a triangle shape under my eyes, down the bridge of my nose and also in the centre of my forehead. The key to this is blending, I blend everything with an angled foundation brush. I will put pictures below of before and after contour and highlighting.

IMG_1150

[caption id="attachment_697" align="aligncenter" width="225"]Before blending Before blending[/caption][caption id="attachment_698" align="aligncenter" width="225"]After Blending After Blending[/caption]

4. Next I set everything with a powder. I used the Wet n Wild Cover All Powder in Light. I really like this powder its not too orangey and doesn't cake up, it is also quite long lasting for the price. I use the Real Techniques Contour brush to set my under eye concealer I feel like it is the perfect shape to get right under my eyes, I then set the rest of my face just using a kabuki brush or a large powder brush it just depends what is closest to me.

IMG_1153

5. I apply some blush at this point before moving onto the eyes, I like to mix together two NYC blushes which are 649 Prospect Park Rose and 655 Central Park Pink These two mixed together are beautiful, I Like to apply just Central Park Pink on the apples of my cheeks to finish off. I apply these using the Multi Task Brush by Real Techniques.

[caption id="attachment_700" align="aligncenter" width="300"](L-R) 655 Central Park Pink , 649 Prospect Park Rose (L-R) 655 Central Park Pink , 649 Prospect Park Rose[/caption]

6. Now onto the eyes, This eye look is so simple and easy to create in just 4 steps. Step 1: I apply Crème brûlée by Wet n Wild all over my lid and brow bone Step 2: I blend Noisette/Nutty by Wet n Wild into my crease to create some definition and to break up the pink. Step 3: I apply Copper Pot from the new palette by w7 which is the In The Nude Palette into my crease using a small precise blending brush to give this eye look a pop of colour Step 4. I finished off by adding Brown eye liner to my lash line and I winged this out. I like to use Brown during the day because it is softer then black. The eye liner I used was 050 Brown Town Girl by Catrice.

[caption id="attachment_701" align="aligncenter" width="300"](L-R) Nutty/Noisette , Crème brûlée (L-R) Nutty/Noisette , Crème brûlée[/caption][caption id="attachment_702" align="aligncenter" width="300"]Copper Pot Copper Pot[/caption][caption id="attachment_703" align="aligncenter" width="300"](L-R) 1. Crème brûlée 2. Nutty, Noisette , 3.Copper Pot   4. Brown Town Girl. (L-R) 1. Crème brûlée
2. Nutty, Noisette , 3.Copper Pot
4. Brown Town Girl.[/caption]

7. To finish off I add some mascara , I recently picked up The colossal Go Extreme! Volum' by Maybelline and I really like this mascara it definitely gives volume but not too much length so I use They're Real by Benefit to give my lashes a bit of length.

IMG_1171

IMG_1034

7. For the final part of my make up I apply Think pink by Wet n wild to my lips and Spray my face with Fix+ by Mac to set everything in place.

10479338_10202394293684883_1350735668_n

IMG_1037

Now onto my hair. I used the BaByliss Volume Waves Hair wand which is just a large 38mm Barrel which helps create soft voluminous waves. This wand is only about €25.00 Which is very affordable for a curling Wand.

1. It is key to make sure the curls are falling away from the face to create this you must use the opposite hand to the side you are using , for example when curling the left side place the wand in your right hand pointing down and wrap the curl around the wand away from your face. Repeat the same step all over the head changing directions for the Right side. Below are some pictures of the first curl and the underneath of my hair curled.

IMG_1053

IMG_1055

once curled you can pin back your fringe/bangs if you wish , I have a middle parting so I just left it alone and didn't pin it back. And the look is complete, hair and make up, I will include a few pictures below of the finished product both hair and make up.

IMG_1057

IMG_1069

IMG_1064

I hope you all liked this tutorial , it is extremely easy and simple to create and beatufiul for everyday use, This hair is also really nice for a night out on the town but just make sure to finish with a good hairspray to keep these waves in place. I hope you enjoyed and as always thanks for reading :).

Wednesday, 2 July 2014

Wet n Wild Haul (now available in Ireland)

Wet n wild cosmetics if you haven't already heard of it, is an american "drug store" brand and it is now available in Ireland. I am unsure as to how long it has been available here or what county's it is on sale in, but I picked up all this stuff in Pennys in Eyre Square shopping centre in Galway, They also had it in the Cara pharmacy in Galway. If anyone knows where else in Ireland they sell it please leave it in the comments, I would really like to know :). Everything I picked up was under €5.00.

1.Wet n Wild Colour Icon Single Eye Shadow.
I picked up four of these Eye shadows, which includes one Glitter single. The shades I picked up are Crème brûlée which is a beautiful creamy light brown matte colour, Nutty which is a medium metalic brown, Sugar which is a white colour with silver shimmer in it and the glitter one is Brass which is chunks of gold glitter. These eye shadows were all €1.99 each. The quality and pigmentation of these are unreal, They are so soft to apply and they come out so pigmented. My Crème brûlée eye shadow broke for some reason and that's the one I was most excited about, you can see in the pictures below where it broke , luckily enough the whole eye shadow didn't break so I can still use it.

[caption id="attachment_671" align="aligncenter" width="300"]Crème brûlée Crème brûlée[/caption]

[caption id="attachment_672" align="aligncenter" width="300"]Nutty Nutty[/caption]

[caption id="attachment_673" align="aligncenter" width="300"]Sugar Sugar[/caption]

[caption id="attachment_674" align="aligncenter" width="300"]Brass Brass[/caption]

2.Wet n Wild Mega Last Lip Colour.
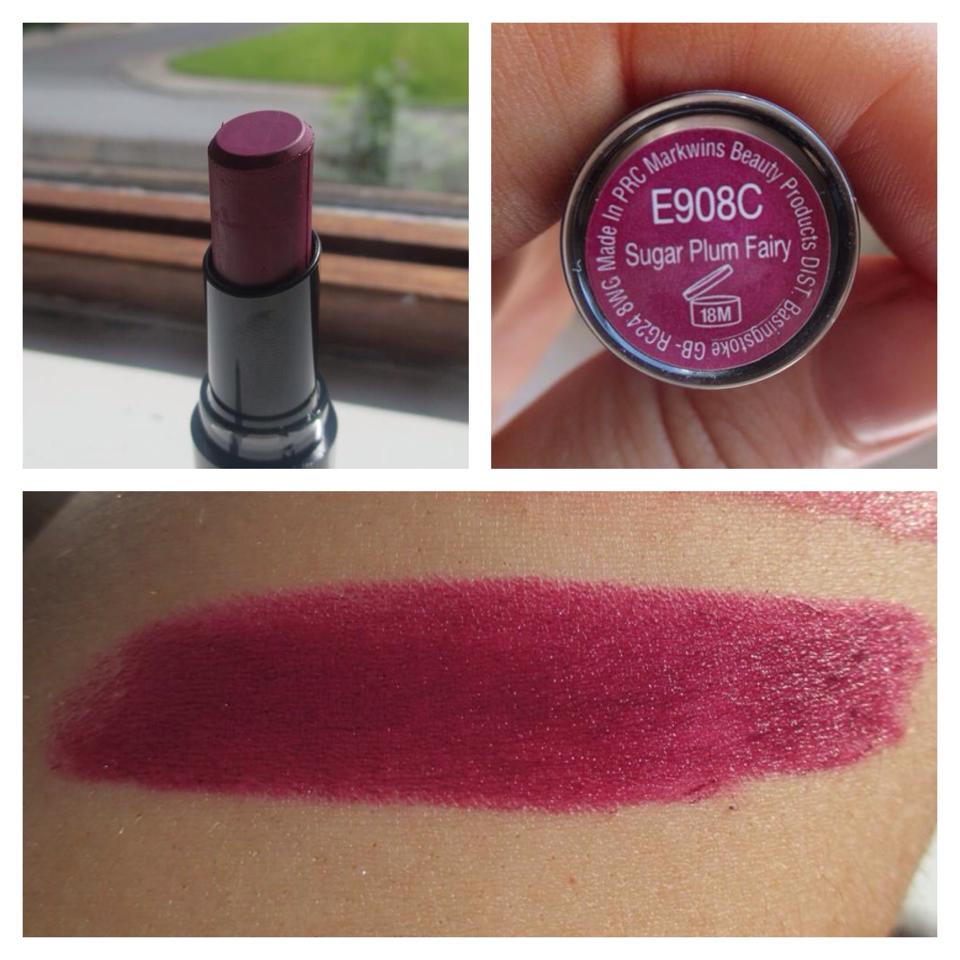
In Penny's, They had 2 types of lipsticks The €1.99 ones and the €2.99 ones. I didn't buy any of the €1.99 ones just because I feel like the ones I picked up had a better colour range. I picked up four shades which were Sugar Plum Fairy which is an amazing dupe for Mac Rebel except it is a lot creamier compared to Rebel which can be quite drying, Think Pink which is an everyday neutral baby pink shade, Spotlight red which is a bright blue toned red which will make your teeth appear whiter and lastly Cherry Bomb which is a beautiful deep wine colour. These lipsticks are extremely pigmented as you will see in the swatches below, I know that these are going to be my new favourite lipsticks.

[caption id="attachment_676" align="aligncenter" width="300"]Sugar Plum Fairy Sugar Plum Fairy[/caption]

[caption id="attachment_677" align="aligncenter" width="300"]Think Pink Think Pink[/caption]

[caption id="attachment_678" align="aligncenter" width="300"]Spotlight Red Spotlight Red[/caption]

[caption id="attachment_679" align="aligncenter" width="300"]Cherry Bomb Cherry Bomb[/caption]

3.Wet n Wild Mega Liner Liquid Eyeliner.
I havent used a liquid Eyeliner in a while now, I usually use gel eyeliner or none at all. I decided to pick up this one to give it a try. The Eyeliner was €2.99, I have heard great things about this eyeliner from what I have read online. The brush is a very small defined one which will hopefull help create the perfect line on the lid. I picked it up in Black to try out.

10516888_10202350948681285_4867051473797281809_n

4. Wet n Wild Cover All Liquid Concealer.
I have been looking for a new concealer lately as I always use my Rimmel Wake me up Concealer so I decided to pick this one up for only €3.49. I have read mixed reviews on this some love it, some hate it. I haven't used it at all yet but when I do I am sure you will all hear about it. I picked it up in the shade light.

[caption id="attachment_683" align="aligncenter" width="300"]Light Light
[/caption]

5.Wet n Wild Cover all Pressed Powder
Again I have been searching for new powders to use so I decided to give this one a try to see if I like it. This powder was€3.99 which again is very cheap for a powder. I have heard mixed reviews about this and just by looking at it I know it will only last a few weeks but for €3,99 I wasn't expecting it to last months. You only get 7.5g of product so I am not expecting too much of this.I picked this up in the shade Light.

[caption id="attachment_684" align="aligncenter" width="300"]Light Light[/caption]

6. Wet n Wild Mega Clear Mascara.
I picked this up because My other clear mascara as you've seen in previous tutorials is not so clear any more. This product was around €2.99 I think. This is just a clear mascara that I use to set my brows and keep them in place.

1604848_10202350947961267_2451228560078129764_n

And that is all the products I picked up from Wet n Wild cosmetics. Again if you know where this brand is being sold in Ireland please let me know. I think I am going to do a tutorial using these products so please let me know if you would like to see that And as always thanks for reading :).

Monday, 30 June 2014

Mini Catrice Haul

This week I went into Cara Pharmacy to pick up some new products. Catrice Cosmetics were having a half price sale so I decided to pick up a few things I have never used and a few I have. I will put links below where I can to all the products.

1. Catrice Intensif'eye Wet and Dry Eye shadow.
I have used the Catrice Absolute eye colours but I have never used the Intensif'eye Eyeshadows, The whole idea of these is that you can use them wet or dry depending on how intense you want them. I picked up 2 shades which are 100 Glamourose and 080 Please Gold The Line. Glmourose is a beautiful mix of pink, purple and a white frosty colour and Please Gold The Line is a mix of gold, blue and copper shades. both of these shades are beautiful and could be worn in the day and the night. These Eyeshadows are originally around €5.00 and I bought them for around €2.50 which is a bargain for the quality of these Eyeshadows.

[caption id="attachment_652" align="aligncenter" width="300"]Glamourose Glamourose[/caption]

[caption id="attachment_653" align="aligncenter" width="300"]Please Gold The Line Please Gold The Line[/caption]

2. Catrice Liquid Metal Eyeshadow.
This eyeshadow is another range by Catrice which is the Liquid Metal Collection. These colours are highly pigmented and feel really buttery and not at all powdery. I picked up the colour 050 We're The Inner Purple which is a beautiful deep Purple with Silver shimmer. These eyeshadows are usually €3.99 each but I got them for €1.99 which again is a bargain.

[caption id="attachment_657" align="aligncenter" width="300"]We're The Inner Purple We're The Inner Purple[/caption]

3. Catrice Absolute Eye Colour Eyeshadow.
I've tried out almost all of the shades in this range of Eye shadows and lately I have been on the hunt for a daytime copper Eye shadow and I really like this shade. All of these Eye shadows are extremely long wearing and buttery to apply. These all retail at about €4.99 and I got them for around €2.50.

[caption id="attachment_659" align="aligncenter" width="300"]Fancy A Coppa Tea? Fancy A Coppa Tea?[/caption]

4. Catrice Long Lasting waterproof Eye pencils.
I have never really used Catrice Eye liners before so when I seen these half price I picked up two so I could try them out, the shades I picked up are 100 Pearly Bird and 050 Brown Town Girl. Brown Town Girl is a matte brown eye liner perfect for an everyday look instead of the normal black eye liner, it gives a softer look to any eye look. Pearly Bird is a Pearl pink colour perfect for the tight line to Brighten up the eyes and make them appear bigger. These eye liners normally retail at about €3.00 but I got them for around €1.50.

[caption id="attachment_662" align="aligncenter" width="300"]100 Pearly Bird 100 Pearly Bird[/caption]

[caption id="attachment_665" align="aligncenter" width="300"]050 Brown Town Girl 050 Brown Town Girl[/caption]

And that's all of the things I picked up from Catrice this week. I have also recently discovered that Wet n Wild Cosmetics have launched in Ireland so I think my next post will be another haul or maybe a one brand make up tutorial so stay tuned for that and as always thanks for reading :).

Also could you all head on over here and follow this girl to see more make up and beauty related things :) - http://gossipgirlnetherlands.wordpress.com

Product List.
Catrice Absolute Eye Colour Eyeshadow- http://www.catrice.eu/products/eyes/eyeshadow/detail/product/absolute-eye-colour-mono-350.html
Catrice Long Lasting waterproof Eye pencils- http://www.catrice.eu/en/products/eyes/eyeliner-eye-pencils/detail/product/longlasting-eye-pencil-waterproof-090.html
Catrice Liquid Metal Eyeshadow- http://www.catrice.eu/en/products/eyes/eyeshadow/detail/product/liquid-metal-eyeshadow-070.html
Catrice Intensif'eye Wet and Dry Eye shadow- http://www.catrice.eu/en/products/eyes/eyeshadow/detail/product/intensifeye-wet-dry-shadow-010.html

Friday, 20 June 2014

Trash Talk: Used Up Products / Empties

At first, I found posts and videos about empty products a bit weird because you are talking about trash basically but now ironically, I love reading them. The opinions given in these posts are honest and usually form over a long period of time, a product may be good for the first few trys but you never know until you finish a product. Most of the products in this post are make up related and have been used up for a good few months now. Now onto the Empties.

IMG_0779

Foundations:
The 3 Foundations I have used up Completely (although it doesn't look that way from the bottles) are Mac's Studio sculpt SPF 15 Foundation in the shade NC15 , Mac Match master Foundation in shade 1.5 and Revlon Colour stay Foundation in the shade 150 Buff. I am going to talk about these in order of which ones I like best.

1. Revlon Colourstay Foundation
I had wanted to buy this foundation for a long time but I held back because it was so expensive here in Ireland, So when I went to Liverpool last year I picked this foundation up. I really enjoyed this foundation, I think it glides on the skin perfectly and the finish is dewy but not oily looking, I usually just set it with powder in the places I needed it like my T-zone. I completely guessed my shade in this and ironically it is probably the only foundation I have found so far that matches my skin. I would 100% recommend buying this foundation.

2. Mac Studio Sculpt Foundation
I bought this foundation the first time I ever got my make up professionally done which was at the Mac Counter in Macys in New York. The only thing about this foundation is that it is quite a thick foundation it is more on the cream rather than liquid side and it was also very pale for me. I don't think I would re-purchase this foundation because I think there is a lot more inexpensive foundations that I can get similar to this one.

3.Mac Matchmaster foundation.
This foundation was also purchased in New York alongside the Studio sculpt. This foundation was way too dark for me I bought it dark because I wanted to use it when I fake tan but it was 3 shades too dark so I used it up doing my friends and families make up as they have a darker skin tone to me. I liked this foundation to apply on other people it glides on and gives a lovely finish.

IMG_0769

Powders:
I have only used up 2 powders completely and they are both from Mac. Number 1 is Mac Studio Careblend Pressed Powder in Light Plus and Number 2 is Mac Select Sheer Pressed Powder in NW15.

1. Mac select Sheer Pressed Powder
This powder was my go to powder when I first started getting into make up , I bought it in New York and it has lasted me almost 3 years which I think is incredible. I always find that the more expensive products tend to last the longest. I will 100% be re purchasing this product because the quality is amazing and it lasts a really long time.

2. Mac Studio Careblend Pressed Powder
Because I was so impressed with the Select Sheer powder I decided to pick up another powder when I went to Liverpool last year. I really enjoyed this powder but strangely I found that it did not last as long as the other Mac powder which was strange. I would 100% recommend this powder regardless, It adds to the finish of whatever foundation you use and leaves the skin flawless.

IMG_0780

Primers:
The 4 Primers that I used up are both for the eyes and face, They are Flormar Illuminating Primer Base, L'Oreal Lumi Magique Primer Base , Benefit Stay Don't Stray Eye Primer and Urban Decay Eye shadow Primer Potion in Eden.

1. Flormar Illuminating Primer Base
I picked this primer up last summer when I was only holiday in Spain. This is a Spanish brand and I was really impressed by their products I picked up 1 blush, a highlighting powder and this primer. This primer gives a beautiful glow to the skin even when you apply foundation over it. This brand is very affordable but I am not sure if you can purchase their products online. I would recommend this primer if you are looking for an affordable illuminating primer.

2. L'Oreal Lumi Magique Primer
I love this primer so much, again its illuminating but it is not as affordable as the one above. L'Oreal also have a foundation to match this primer, they are both amazing quality for a drug store product. I would reccomend trying these out if you have not already.

3. Urban Decay Primer Potion in Eden.
This primer has been raved about for so long, the one I have is a sample size which came with a palette that I purchased from Urban Decay. This primer keeps shadow on all day and is an amazing product to have in tour collection/kit.

4. Benefit Stay Don't Stray Primer
This product can double up as a primer and a concealer, I really liked to use this to conceal under my eyes it made me look wide awake and bright and it also keeps eye shadow on for hours without moving. This is a great product to invest in and it last a good few months.

IMG_0766

Mac Fix+.
I have been obsessed with this setting spray ever since I purchased it 3 years ago, I have gone through 3 bottles since then, I am on my fourth bottle at the minute. I can't do my make up without setting it with this after, The smell of this spray is so refreshing and clean , I feel like it makes my make up look 100 times better. I know there is thousands of setting sprays on the market but I don't think I will be changing from this one.

IMG_0767

Mac Brush cleanser.
This product is one of many few I haven't re-purchased yet, Just because I think this cleanser is okay to wipe a little bit of make up off your brushes just before you want to use them but it doesn't work as well as baby shampoo and I think that is why I haven't re- purchased it yet. I will in the future but I am not in any rush to re purchase it soon.

And that is all of the Empties I have so far, I decided to do this post because it was something different to tutorials and hauls and things. Also I am really sorry about the late post, this week has been very busy as I just finished my Leaving Certificate so I apologise and I will be posting back to Normal every Wednesday from now on and as always Thanks for reading :).

Wednesday, 11 June 2014

Daytime Bronze/copper Eye Look.

I have worn copper eye shadow before but I always thought it didn't suit me, This week I decided to try out a look using a beautiful copper eye shadow I rediscovered in my collection. This eye shadow is extremely hard to find on line and I am not sure why, I think it may be discontinued or the packaging could have been changed. The Eye shadow is Rimmel Colour rush Mono eye shadow in 060 Bronzed. These eye shadows have a bronze glitter on the top and then a bronze subtle colour underneath. I completely forgot to photograph this before I used it so these pictures show what is underneath the bronze shimmer. If you have blue eyes this look will be your new go to look it brings out the blue in the eyes, and of course it is also stunning on every other eye colour :). Now onto the tutorial.

1. I start off with my normal foundation routine, I am using a moisturiser to prime my face as I have been very dry lately. I then take my Rimmel wake me up foundation and apply that all over my face using a flat top foundation brush. I like to move straight onto my eyebrows after because I am cream contouring in this look so i want to allow my foundation to settle a little bit.

IMG_0701

2. For my eyebrows, I am using the Smashbox Bow Tech in Smashing Auburn. I like to comb my brow hairs with a brow comb first then I outline my brow shape with an angled brush and just run the brush over them spreading the powder but keeping my natural shape. I then run a clear mascara over them to make sure they stay in place throughout the day.

1010092_10202121103175291_2632792771153984848_n

3. Next to the cream contouring, My last post was an in depth version of cream contouring so I wont go into too much detail. I have really been enjoying the w7 Catwalk Face shaper kit , I now use it daily I think its very easy to use , quick and there is no danger of getting the muddy cheek look. I just apply this to my nose, forehead and cheekbones. I then highlight my under eyes in a triangle shape using the Rimmel Wake Me Up Concealer.

IMG_0703

4. I then use Mattify Cosmetics Original translucent powder to set everything on my face. Personally, I prefer to go over the cream contour with a powder just to make sure it stays in place all day. I used Physicians Formula Organic Wear 100% Natural Origin Bronzer. I don't think I have ever spoke about this bronzer before but I love it if I want a natural look because it suits my skin tone perfectly. I used a powder highlighter (sleek face contour kit in medium) on the tops of my cheeks and down the centre of my nose. For my blush I used the NYC blush in Prospect Park Rose.

10394858_10202222879719641_3656039702957260854_n

5. Now the eyes. It is extremely simple all I did was take the Rimmel eye shadow in Bronzed to my crease and underneath my eyes. I blended the colour out until I was happy with it and I then added the highlighter I used on my face to the centre of my lid to break up the look a little bit. You can add eye liner if you wish but I wanted a daytime simple easy look so I just added 2 coats of mascara.

[caption id="attachment_619" align="aligncenter" width="300"]060 Bonzed 060 Bonzed[/caption]
IMG_0712

6. For my lips I wanted a baby pink natural shade so I mixed together Mac Creme D'Nude and Rimmel Kate moss Matte Lipstick in 102.

IMG_0612

And the look is complete, This look is so simple and easy to recreate and will make blue eyes pop. I hope you liked this tutorial. Dont forget to follow me on all my social media to see more of my everyday looks all links are to the right of this post on the sidebar and as always Thanks for reading :).

IMG_0682
10308053_10202222946881320_8976795289555892182_n